Selecting an incorrect semi tubular rivet grip range causes catastrophic joint failures and severe vibration loosening. By precisely measuring your total material stack and matching it to the rivet’s specified clamping interval, you ensure a secure, perfectly flared tail and eliminate costly assembly rework.
As the Chief Manufacturing Engineer at Dongguan Jiliang Machinery Hardware, I frequently review failed assemblies where the designer confused the rivet’s overall length with its actual clamping capacity. Mastering this metric is the single most important step in precision fastening engineering. This technical breakdown explains how to calculate, select, and specify the exact clamping capacity required for your production line.
Table of Contents
- What Exactly is a Fastener Grip Range?
- Why Does a Short Grip Range Cause Joint Failure?
- What Happens When the Grip Range is Too Large?
- How Do You Calculate the Total Material Stack-Up?
- Are There Standard Grip Range Intervals for Thin Materials?
- How Do Material Properties Alter the Ideal Grip Range?
- Case Study: Resolving Looseness in Aluminum Furniture Assembly
1. What Exactly is a Fastener Grip Range?
Understanding fundamental terminology is critical before specifying hardware for automated production. Fastening engineers must distinguish between the total physical length of the uninstalled rivet and the actual thickness of the materials it holds.
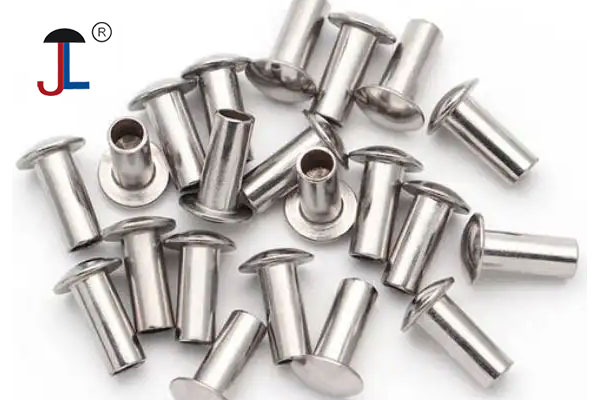
Grip range is the specific minimum and maximum material thickness interval that a rivet is designed to clamp effectively. It differs from overall length because it strictly accounts for the portion of the tubular tail that must be rolled backward to form a secure structural hold.
The Mechanics of the Clinch Allowance
When you order a semi tubular rivet, you are essentially buying two distinct zones: the “grip” (the solid or straight portion that rests inside the drilled holes) and the “clinch allowance” (the hollow tail that protrudes out the back).
- Design Angle 1: The Working Interval. A single rivet length does not work for just one exact thickness. Because the hollow tail can be compressed slightly more or slightly less by the setting anvil, the fastener operates within a defined tolerance band (e.g., 0.067–0.098 inches).
- Design Angle 2: Manufacturer Specifications. At Jiliang, we engineer the depth of the tubular hole based on the intended grip range. If the hole is too shallow, the tail won’t roll. If it is too deep, the shank may buckle inside the materials.
Examples of Application:
- Appliance Manufacturing: When fastening a 1mm steel hinge to a 1mm steel door, the grip range must perfectly encompass the 2mm total thickness.
- Aerospace Interiors: Securing overlapping composite panels requires a fastener where the grip range accounts for minor variations in resin thickness across the panel surface.
2. Why Does a Short Grip Range Cause Joint Failure?
Specifying a rivet that is too short for the material stack is a common procurement error. When the fastener lacks sufficient tail length protruding from the back of the workpiece, the structural integrity of the joint is immediately compromised.
If the material thickness exceeds the maximum grip range, the tubular tail cannot fully roll over the substrate. This results in incomplete flaring, yielding a weak joint lacking sufficient axial clamping force, which will rapidly vibrate loose under normal operational loads.
The Dangers of Incomplete Flaring
When a semi tubular rivet is set, the strength of the joint relies entirely on the curled lip of the tail pressing tightly against the bottom material.
- Theoretical Basis: A proper roll clinch requires the tail to fold back approx 180 degrees. If the grip range is too small, only a 90-degree flare or a slight bulge forms. This fails to create the mechanical interference necessary to lock the plates together.
- Practical Impact: The joint may look acceptable to a visual inspector looking straight down, but any lateral shear force or vertical pull-out force will pop the rivet head clean off or pull the barely-flared tail through the hole.
Examples of Application:
- Consumer Electronics: We evaluated a dropped-device failure where a PCB detached from a chassis. The 1.2mm grip range was used on a 1.4mm stack. The tail barely flared, and the shock of the drop pulled the board over the rivet.
- HVAC Ducting: A contractor used under-sized rivets on a triple-layer sheet metal seam. Under high-pressure air flow, the vibration caused the partially flared tails to flatten out, unzipping the duct seam.
3. What Happens When the Grip Range is Too Large?
While designers often worry about rivets being too short, specifying a fastener with excessive length creates equally severe manufacturing defects. Too much material protruding beyond the stack prevents the setting tool from operating correctly.
When the material thickness falls below the minimum grip range, the excessive tubular length will buckle or bend sideways before it can roll. This creates an uneven, structurally compromised clinch that damages soft materials and creates an unacceptable, protruding surface finish.
The Mechanics of Shank Buckling
The setting anvil is designed to direct force outward and backward. If the tail is too long, the column strength of the thin tubular wall fails before the rolling action begins.
- Design Trade-offs: You cannot simply order “extra-long” rivets to cover multiple applications. If the grip range is 0.286–0.317 in, and you use it on a 0.150 in stack, the long tail will collapse into a zig-zag shape inside the hole or mash flat against the surface.
- Aesthetic Impact: In consumer-facing products, a buckled rivet tail looks highly unprofessional, often exhibiting sharp, jagged edges that pose a safety hazard to end-users.
Examples of Application:
- Automotive Trims: A client attempted to use a long rivet for both a 2-plate and a 3-plate assembly. On the 2-plate joint, the excessive grip range caused the tail to bulge outward radially, cracking the plastic trim piece.
- Folding Furniture: A rivet that is too long will not clamp the metal tubing tightly. Instead of a rigid joint, the oversized grip range leaves a gap, causing the folding chair mechanism to wobble and rattle.
4. How Do You Calculate the Total Material Stack-Up?
Accurate calculation of the material stack is the foundational step in fastener procurement. Engineers must account for every layer, coating, and tolerance variation within the joint to determine the absolute minimum and maximum operational thickness.
To determine the correct semi tubular rivet grip range, strictly measure the combined maximum thickness of all components being joined, including backing washers, gaskets, and paint layers. Select a fastener specification whose grip interval entirely covers this calculated dimensional tolerance.
Precision Measurement Strategies
Calculating the stack-up requires more than just adding the nominal thicknesses on a CAD drawing. Manufacturing realities dictate that materials fluctuate.
- Accounting for Coatings: A 2.0mm steel plate might be 2.1mm after powder coating. If you are joining two plates, that is an extra 0.2mm. If your grip range maximum is strictly 4.0mm, the 4.2mm actual stack will cause an incomplete flare.
- Compressible Materials: If your stack includes a rubber gasket, you must calculate the thickness of the gasket in its compressed state, not its resting state, to ensure the rivet clamps down to the correct final dimension.
Examples of Application:
- Marine Hardware: Joining an aluminum bracket (3mm) to a fiberglass hull (5mm) with a sealant layer (0.5mm). The calculated stack is 8.5mm. We specified a custom rivet with an 8.2–8.8mm grip range.
- Electrical Switchgear: Joining copper busbars. The engineer forgot to include the thickness of the brass backing washer used to distribute the load. The initial rivets failed to roll. Recalculating the stack to include the 1mm washer solved the issue.
Table 1: Material Stack-Up Calculation Matrix
| Component Layer | Nominal Thickness | Manufacturing Tolerance | Coating / Compression Factor | Final Calculated Contribution |
| Top Plate (Steel) | 0.060″ | $\pm$ 0.002″ | + 0.005″ (Powder Coat) | 0.063″ – 0.067″ |
| Middle Gasket | 0.030″ | $\pm$ 0.005″ | – 0.010″ (Compressed) | 0.015″ – 0.025″ |
| Bottom Plate (Alum) | 0.080″ | $\pm$ 0.003″ | None | 0.077″ – 0.083″ |
| Total Stack-Up | — | — | — | 0.155″ to 0.175″ |
| Actionable Step | Select a rivet with a grip range that spans from at least 0.150″ to 0.180″. |
5. Are There Standard Grip Range Intervals for Thin Materials?
Fastener manufacturers produce rivets in standardized length increments to support high-volume manufacturing. Understanding these standard intervals allows designers to engineer their material stacks to utilize off-the-shelf hardware, avoiding custom tooling costs.
Manufacturers provide standard grip range intervals, such as 0.067–0.098 inches for thin sheet metal assemblies, and 0.286–0.317 inches for medium-thickness structural stacks. Designing your material thickness to fit within these standard commercial boundaries ensures readily available inventory and lower fastener costs.
Utilizing Standard Tooling Standards
At Jiliang, we maintain massive inventories based on the most common industrial plate thicknesses.
- The Economy of Scale: If your CAD design dictates a material stack of 0.200 inches, we have standard rivets designed for a 0.185–0.215 grip range. If you design a bizarre stack of 0.275 inches, you may fall into a gap between standard sizes, necessitating a custom-cut length.
- Design for Manufacturability (DFM): The best engineers adjust their plastic wall thicknesses or metal gauges slightly during the prototyping phase specifically so the final stack matches a widely available, high-volume rivet grip range.
Examples of Application:
- Lighting Fixtures: A manufacturer joining two sheets of 20-gauge steel (approx 0.036″ each, total 0.072″). This fits perfectly into the highly common 0.067–0.098 in (1.7–2.5 mm) grip range, keeping supply chain costs minimal.
- Server Rack Assembly: Joining heavy-duty rails. The total thickness was exactly 0.300″. We supplied them directly from our stock of 0.286–0.317 in (7.3–8.1 mm) rivets, ensuring zero lead time for their production line.
6. How Do Material Properties Alter the Ideal Grip Range?
The hardness and elasticity of the joined materials can influence how the rivet behaves during installation. While the physical thickness remains the primary metric, the substrate’s resistance to compression can shift the effective grip range required for a secure joint.
When fastening soft materials like plastics or rubbers, the substrate compresses significantly under the anvil’s pressure. In these cases, engineers must specify a grip range based on the fully compressed thickness of the stack, rather than the free-state thickness, to ensure tight engagement.
The “Sink” Factor
The force required to roll the tubular tail will push the rivet head into the top material.
- Hard vs. Soft Substrates: If you are riveting two stainless steel plates, the material will not compress. The grip range is exactly the measured thickness. However, if you are riveting a nylon bracket to a fiberglass board, the 1,500 lbs of setting force will cause the rivet head to sink into the nylon by a fraction of a millimeter.
- Adjusting the Spec: In highly compressible stacks, we often recommend aiming for the higher end of the grip range interval. This ensures that even if the material squishes down during setting, the tail isn’t so long that it buckles.
Examples of Application:
- Leather Goods: When assembling heavy tool belts, the leather compresses drastically under the press. A 10mm thick stack of leather will crush to 7mm during riveting. The selected rivet must have a grip range encompassing 7mm, not 10mm.
- Injection Molded Housings: Securing a heavy battery contact to an ABS plastic shell. We noticed the rivet head was embedding into the plastic. We adjusted the grip range calculation to account for a 0.2mm compression sink, resulting in perfectly flush, tight joints.
7. Case Study: Resolving Looseness in Aluminum Furniture Assembly
Theoretical calculations must hold up on the factory floor. This case study demonstrates how an error in grip range calculation led to field failures, and how re-engineering the fastener specification permanently resolved the quality issue.
A furniture manufacturer experienced vibration failure because their selected rivet grip range only accounted for the aluminum panel, ignoring the underlying support bracket. By switching to a 0.286–0.317 inch grip range that fully covered the total material stack, the factory achieved standard tail flaring and zero rework.
Analyzing the Engineering Failure
We recently consulted for a lightweight furniture manufacturer producing outdoor aluminum tables. They were using semi tubular aluminum rivets to fasten decorative top panels to heavy extruded support brackets.
The Initial Problem: During transit and subsequent vibration testing, the tabletop panels were rattling loose. A teardown revealed that the rivet tails had not fully rolled over. The procurement team had ordered a rivet based only on the thickness of the top panel (approx 0.100″), ignoring the 0.200″ flange of the support bracket below it.
The Jiliang Intervention:
The actual total stack thickness was 0.300″. Because they were using a rivet with a grip range designed for thinner materials, the tubular tail did not protrude far enough through the bottom bracket to allow the anvil to curl it. It simply bulged slightly inside the hole.
We immediately halted their line and supplied a new specification with a grip range of 0.286–0.317 in (approx 7.3–8.1 mm). We also recalibrated their pneumatic presses to accommodate the slightly longer stroke required.
The Production Results:
- Every rivet produced a perfect, 180-degree rolled flange against the bottom bracket.
- The assembled tables passed aggressive mechanical vibration testing without a single joint loosening.
- The factory’s rework rate dropped to zero, and warranty claims for loose panels were entirely eliminated.
This case emphasizes a universal truth in fastening: a rivet’s performance is entirely dependent on precisely matching its geometric capability to the physical reality of the material stack.
Table 2: Troubleshooting Rivet Flaring Failures
| Visual Defect | Physical Cause | Grip Range Diagnosis | Corrective Action |
| Tail barely flared (Bulged) | Insufficient material protruding through the hole. | Grip Range is too short. | Specify a rivet with a longer minimum grip range. |
| Tail buckled / folded sideways | Excessive thin-walled tube extending beyond the stack. | Grip Range is too long. | Specify a shorter rivet, or add a backing washer. |
| Head sunk deep into material | Anvil pressure too high for the soft substrate. | Stack compressed beyond the grip range limits. | Lower press force; recalculate grip range for compressed state. |
| Splitting/cracking at the tail | Material is work-hardened or anvil is worn out. | Not a grip range issue. | Switch to annealed material or replace setting tools. |
Conclusion
Designing a secure joint requires looking past the unit price of a fastener and focusing strictly on its dimensional mechanics. The semi tubular rivet grip range is the defining metric that determines if your assembly will survive in the field or rattle apart during shipping.
Always measure your maximum total stack-up—including coatings and compression factors—and ensure it falls comfortably within the manufacturer’s specified clamping interval.
Are you experiencing loose joints or buckled rivet tails on your line?
Send your material stack-up dimensions to the engineering team at Dongguan Jiliang Machinery Hardware. We will run the exact clinch calculations and provide the precise grip range specification required to stabilize your assembly process.
Frequently Asked Questions (FAQ)
1. Is “Grip Range” the same thing as the rivet’s length?
No. The length is the total physical measurement of the rivet shank from under the head to the tip of the tail. The grip range is the calculated thickness of the materials that the rivet can successfully hold after the tail has been rolled over.
2. How do I measure my material stack-up correctly?
Use a digital caliper to measure the combined thickness of all pieces being joined. You must include the thickness of any paint, powder coating, adhesive layers, and backing washers that the rivet will pass through.
3. What happens if my material thickness falls exactly on the maximum grip range number?
It will usually work, but it leaves zero margin for error in your manufacturing process. If your material runs slightly thick that day (due to heavy paint, for example), the rivet will fail to flare. It is always safer to target the middle of the grip range interval.
4. Can I use a longer rivet and just smash it down harder?
No. A semi tubular rivet has a specific hole depth at the tail. If you use a rivet that is far too long, the solid portion of the shank will protrude from the hole, and the setting tool will simply crush and buckle the shank sideways, ruining the joint.
5. How much of the rivet should protrude before it is set?
This is known as the “clinch allowance.” As a general engineering rule of thumb, for a standard roll clinch, the length of the tail protruding from the bottom of the material should be approximately 50% to 60% of the rivet’s shank diameter.