Nail screws, also known as screw nails or drive screws, are a popular hybrid fastener known for the installation speed of a nail and the holding power of a screw. Their aggressive threads and durable design make them a go-to choice for countless construction and woodworking projects. However, a common question arises, especially among those new to these powerful fasteners: is pre-drilling really necessary?

As experts in fastening solutions at RivetJL, we’re here to provide a definitive answer. This guide will walk you through exactly when and why pre-drilling is not just recommended but essential for achieving the best results with nail screws. We’ll explore the materials involved, the physics behind the process, and provide a step-by-step guide to doing it right.
Table of Contents
- What Exactly Are Nail Screws?
- The Crucial Question: Why is Pre-Drilling Recommended?
- When is Pre-Drilling for Nail Screws a Must? (Material-Specific Guide)
- Are There Times You Can Skip Pre-Drilling?
- How to Pre-Drill for Nail Screws: A Step-by-Step Guide
- Pro Tips from the Experts at RivetJL
- Frequently Asked Questions (FAQ)
- The Final Verdict: To Drill or Not to Drill?
What Exactly Are Nail Screws?
Before diving into the “how” and “why” of pre-drilling, let’s clarify what a nail screw is. Unlike a traditional screw, which is always driven with a turning motion, a nail screw is often designed to be driven part-way with a hammer, like a nail, and then seated with a driver. Some variations are driven entirely with a pneumatic nail gun or a driver. Their primary advantage lies in their helical shank (the threads), which provides significantly more withdrawal resistance than a smooth-shank nail.
This design makes them ideal for applications where vibration or wood movement could cause regular nails to loosen over time, such as in subflooring, decking, crating, and framing. Their robust nature seems to suggest they can power through anything, but that’s a misconception that can lead to costly mistakes, especially in hard materials.
The Crucial Question: Why is Pre-Drilling Recommended?
Pre-drilling, the process of drilling a “pilot hole” before inserting a screw, might seem like an extra, time-consuming step. However, for hard materials, its benefits are immense and address several potential points of failure. In our experience, skipping this step is the number one cause of project frustration and material damage.
Preventing Splitting and Cracking
This is the most critical reason to pre-drill. When a nail screw enters a dense material like oak, maple, or a composite board, it displaces that material. Without a pre-cleared path, the pressure exerted by the screw’s shank and threads has nowhere to go but outwards. This immense outward force can easily overwhelm the material’s internal cohesion, causing it to split or crack. This is especially true when working near the edge or end of a board (the end-grain), where there is less material to absorb the pressure.
A pilot hole removes a volume of material slightly smaller than the screw, creating a channel that relieves this pressure. This allows the screw’s threads to bite into the surrounding material for a tight grip without the risk of catastrophic splitting. A split board is not just an aesthetic issue; it’s a structural failure that compromises the entire connection.
Ensuring a Straight and Accurate Drive
Hard materials can be unforgiving. Attempting to drive a nail screw into dense wood or composite without a pilot hole can cause the screw to “walk” or wander from its intended mark. The tip may struggle to gain purchase and skate across the surface. Even if it starts, it can be deflected by the grain or a denser part of the material, resulting in a crooked, misaligned fastener.
A pilot hole acts as a guide, ensuring the nail screw drives straight, true, and exactly where you intended. This is vital for projects that demand precision and a clean, professional appearance, such as furniture making, cabinetry, and finish work.
Reducing Friction and Driver Strain
Driving a large screw into dense material generates a significant amount of friction, which in turn creates heat. This heat can be enough to weaken the screw, making it more likely to snap mid-drive. Furthermore, the high torque required to overcome this friction puts immense strain on your drill or impact driver, potentially burning out the motor or draining batteries quickly.
It also increases the risk of “cam-out,” where the driver bit slips out of the screw head, potentially stripping the head and making the screw impossible to drive or remove. A pilot hole dramatically reduces this friction, allowing for a smoother, cooler, and easier drive that protects your screw, your tools, and your arm.
When is Pre-Drilling for Nail Screws a Must? (Material-Specific Guide)
The need for pre-drilling is almost entirely dependent on the density and composition of the material you are fastening. Here’s a clear breakdown of which materials demand a pilot hole.
| Material Type | Pre-Drilling Required? | Why? |
|---|---|---|
| Hardwoods (Oak, Maple, Ipe, Hickory, Ash) | Yes, Always | Extremely dense and prone to splitting. Forcing a screw without a pilot hole is almost guaranteed to cause cracking, especially near edges. |
| Dense Composite Decking | Yes, Highly Recommended | Composites are brittle and do not compress like wood. The pressure from a screw will cause splitting or “mushrooming” (where material bulges around the screw head). |
| Engineered Lumber (LVL, PSL) | Yes | The glues and resins used in these products make them incredibly dense and hard. Pre-drilling is essential to prevent delamination and ensure a proper drive. |
| Pressure-Treated Lumber (Dense varieties) | Often, Yes | While often based on softer woods, the treatment process can make the wood harder. It’s best practice to pre-drill, especially with thicker screws or when near an edge. |
| Masonry (Concrete, Brick) | Yes, Absolutely | A specialized masonry bit is required to drill a pilot hole. A nail screw cannot displace concrete or brick; it must be driven into a pre-drilled hole, often with a plastic or metal anchor. |
| Plywood & MDF | Recommended | While less prone to splitting than solid hardwood, these materials can delaminate or bulge around the screw. Pre-drilling ensures a clean finish. |
Are There Times You Can Skip Pre-Drilling?
While we advocate for pre-drilling as a best practice, there are specific scenarios where you can often get away with skipping it. This is typically limited to working with softer materials where the risk of splitting is minimal.
Softwoods like Pine, Fir, Cedar, and Spruce are much more forgiving. Their fibrous structure can compress to accommodate the screw’s volume without splitting, especially when you are not working close to the end or edge of the board. Many modern nail screws designed for framing or general construction even feature self-drilling or cutting tips specifically for use in softwoods, further reducing the need for a pilot hole in these applications.
However, even in softwoods, if you are using a large-diameter nail screw or are fastening within an inch of the board’s edge, taking a few extra seconds to drill a pilot hole is cheap insurance against a costly split.
How to Pre-Drill for Nail Screws: A Step-by-Step Guide
Properly pre-drilling is a simple skill that elevates the quality of your work. Follow these steps for a perfect pilot hole every time.
Step 1: Choose the Right Drill Bit
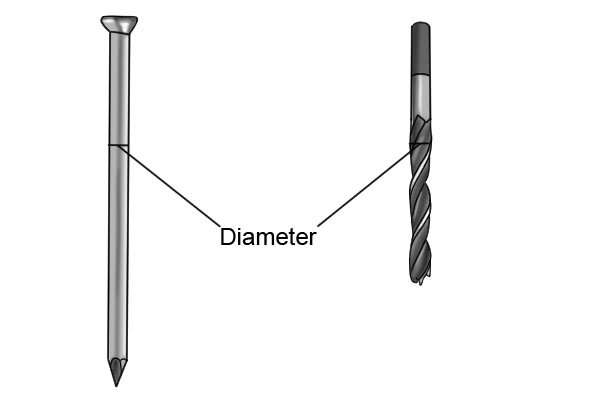
The goal is to remove material for the screw’s shank, but leave enough for the threads to bite into. The rule of thumb is to select a drill bit that is the same diameter as the screw’s shank (the solid core), not the outer threads.
A simple way to check this is to hold the drill bit in front of the screw. You should be able to see the screw’s threads clearly behind the bit, but the shank should be hidden. If you can see the shank, your bit is too small. If you can’t see the threads, your bit is too large and the screw won’t have enough material to grip.
Step 2: Mark Your Spot and Set the Depth
Use a pencil to precisely mark where you want to drive the screw. For setting the depth, you want the pilot hole to be slightly deeper than the length of the screw that will be embedded in the material. A simple pro trick is to hold the screw next to your drill bit and wrap a small piece of painter’s tape around the bit to mark the required depth. This visual guide prevents you from drilling too shallow or too deep.
Step 3: Drill the Pilot Hole
Position the tip of the drill bit on your mark. Ensure your drill is perpendicular (at a 90-degree angle) to the material surface to create a straight hole. Apply steady, even pressure and drill down to your depth marker. If you are drilling through two pieces of wood, you may need to use two different bit sizes: a “clearance hole” in the top piece (same diameter as the threads) and a “pilot hole” in the bottom piece (same diameter as the shank). This ensures the screw pulls the two boards together tightly.
Step 4: Drive the Nail Screw
With the pilot hole drilled, you can now drive your nail screw. It will go in smoothly, with significantly less effort and a much lower risk of damaging the material. Drive it until the head is flush with the surface or slightly countersunk for a professional, finished look.
Pro Tips from the Experts at RivetJL
- Countersinking: For an ultra-clean finish where the screw head sits perfectly flush or below the surface, use a countersink bit after drilling your pilot hole. This creates a conical recess for the screw head to sit in.
- The Soap Trick: For particularly tough hardwoods, even with a pilot hole, driving a long screw can be difficult. A classic woodworker’s trick is to lightly rub the screw threads on a bar of soap or a bit of wax. This acts as a lubricant, reducing friction for an even smoother drive.
- End-Grain Caution: Fastening into the end-grain of a board is always weaker and more prone to splitting. If you must do it, pre-drilling is not optional—it’s mandatory.
Frequently Asked Questions (FAQ)
What happens if I don’t pre-drill in hardwood?
You will most likely split the wood. At best, you will find it extremely difficult to drive the screw straight, and you risk stripping the screw head or breaking the screw itself. The resulting connection will be weak and unprofessional.
Can I use a regular screw instead of a nail screw?
It depends on the application. Nail screws are designed for speed and high withdrawal resistance, often in structural contexts. Traditional wood screws are better for applications requiring clamping force and potential disassembly, like cabinetry. Use the fastener designed for the job.
How does a nail screw’s design affect the need for pre-drilling?
Some advanced nail screws have special “self-drilling” tips or notched threads designed to clear away material as they are driven. While these can reduce the need for pre-drilling in softer woods or some composites, they are not a substitute for proper pilot holes in very dense hardwoods like Ipe or Maple.
The Final Verdict: To Drill or Not to Drill?
For nail screws in hard materials, the answer is a resounding yes, you must pre-drill. It’s the difference between a secure, professional result and a split, compromised one. While it may take a few extra moments per screw, the time saved by avoiding cracked boards, broken screws, and general frustration is immeasurable. It protects your material, your tools, and the structural integrity of your project.
When in doubt, always err on the side of caution and drill a pilot hole. It’s a hallmark of quality craftsmanship. For all your high-quality fastener needs, from specialized nail screws to every component in between, trust the experts at RivetJL to provide the products and knowledge you need to get the job done right.